Deep Dive: Intake and Charting Forms
Last updated: August 7, 2026
All Osmind master forms automatically sync to Sub-Organizations (your practice) and receive ongoing updates. These forms cannot be edited by your practice, see why here.
Creating Intake and Charting Forms
Navigate to Forms in the left-hand menu to view all form templates in your account.
Form categories:
Intake forms (DEFAULT)
Paperwork for new or existing patients to complete
Charting templates
Provider documentation templates for sessions
Includes Prefill capability to load answers from the previous session
Program forms
Forms used for automated online programs
If a form needs to be converted to another type after creation, click into the form and navigate to Options → Convert to {desired form type}.
Creating a form
Click Create form (upper-right corner)
Name your form → click Submit
Drag fields from the left question bank into the form builder on the right
The form builder auto-saves as you work
Available Question Banks
a. Default
General customizable fields
Multiple choice, text fields, matrix tables, etc.
Matrix fields create custom tables for collecting or displaying patient information using text or checkboxes
b. Charting
Common charting form fields
Pre-configured fields designed for clinical documentation
c. Patient Info
Smart fields for patient demographics
Smart fields auto-populate into the patient profile when completed by the patient (intake) or provider (charting)
Includes demographics, metrics, and basic patient information
d. Agreement
Consent and signature fields
Read-only fields for agreement text, headers, or logo uploads
Signature field for e-signatures (must be marked Required if used)
Guardian information fields
e. HIPAA
Templated HIPAA compliance language
f. Video
Video embedding
Allows videos to be embedded directly within forms
g. Copied
Map intake data to charting notes
Click Copy next to any field in a form
The copied field appears in the Copied question bank
Can be added to a separate charting template to store the same data point across multiple forms
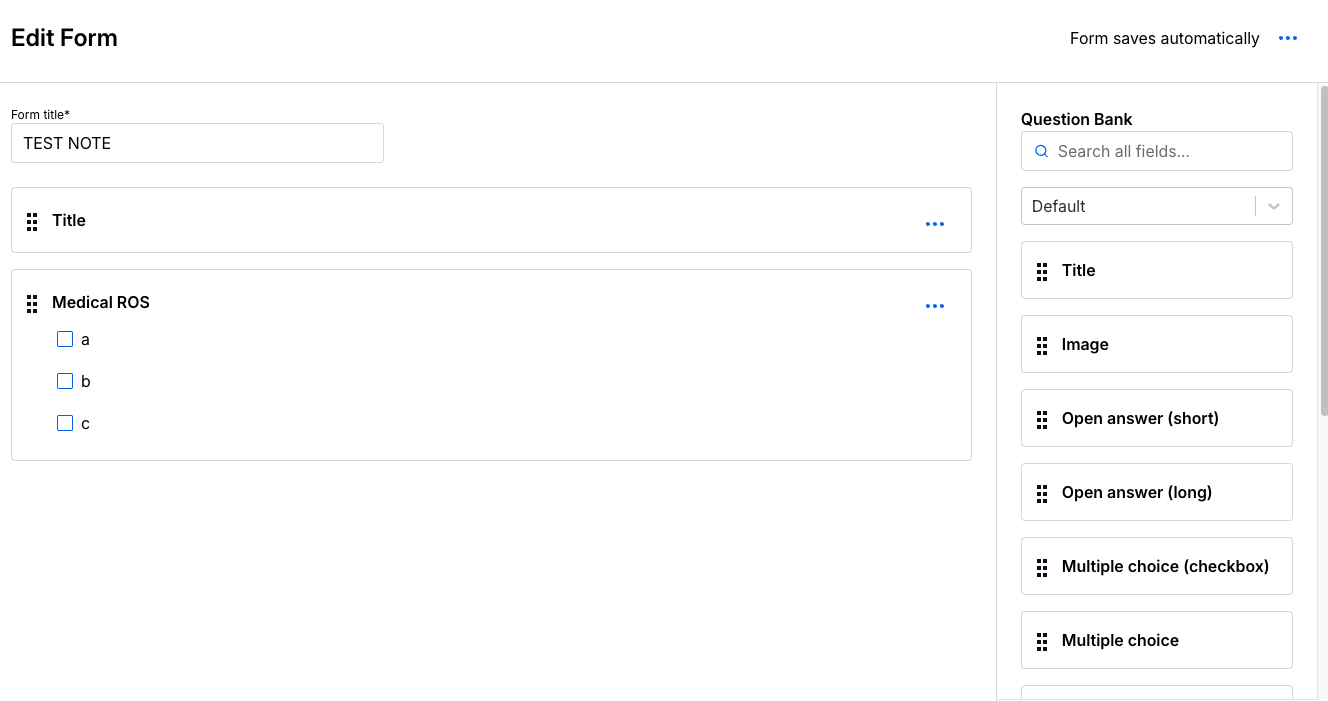
Click Edit on any field to customize question text and options
Mark fields as Required as needed to prevent patients from skipping
Signature fields should always be required
Fields can be dragged and dropped to reorder
Additional Options Menu
Copy / duplicate form
Rename form
Download PDF version
Other form management functions
Manually Sending Form Requests
When a form request is sent, an email notification is triggered prompting the patient to log into Osmind and complete the form.
Send a One-Off or Recurring Form Request
Request form completion using one of the following methods:
Forms page → click three dots next to a form → Request Form Completion
Patients page → select patient → Charting → Request Form Completion
Patients page → Patient Groups tab → click three dots next to group → Request Form Completion
Select either:
The individual patient or patient group the form should be sent to, or
The form that should be sent to the selected patient or patient group
For recurring forms, select:
“This form should recur”
Recurrence frequency
(Optional) End date
Select Send Form Request Email
If recurring, future requests are automatically scheduled.
Send Appointment-Based Form Requests
Forms configured at the appointment type level will send every time a patient books or attends that appointment type.
Configure appointment-based form automation
Click the gear icon → Settings → Appointment Types
Locate the appointment type → click Edit Settings
Configure automation timing:
After Booking – immediately, 1 hour, 1 day, or 1 week after booking
Before Appointment – X time before appointment (e.g., 2 hours, 1 day)
After Appointment – after appointment is marked occurred
Save settings
Track and Manage Form Completion
Navigate to Patient Profile → Charting → View Patient Forms.
This view shows:
Form requests
Completion status
Request history
Actions for Incomplete Forms
Send Reminder
Delete Request
Skip for Patient (intake flow forms no longer needed)
Fill Out (complete form on patient’s behalf)
View Form History (timeline of sent, opened, and completed events)
Actions for Completed Forms
View – review the patient’s submitted responses
Conditional Logic in Forms
Conditional logic allows questions to appear only when prior questions are answered in a specific way.
Configure conditional logic
Click the three dots next to the “child” question → Edit
Check Show field conditionally
Configure:
Conditional Field – the “parent” question
Condition Dependency
Value
Example:
To show Dx2 only if Dx1 is filled out:
Conditional Field: Dx1
Condition Dependency: is not equal to
Value: (blank)
Previewing conditional logic
Forms do not visually indicate which fields use conditional logic. To test:
Method 1:
Send the form to a test patient
Navigate to Charting → Fill Out
Method 2:
Add the form to a Test Intake Flow
Assign to a Test Patient Group
Preview within the intake flow
Intake Flows Configuration
Intake flows automatically prompt patients to complete forms when invited to the portal. They collect billing, insurance, and consent information in a HIPAA-compliant format.
Every patient receives the Default Intake Flow unless assigned to a patient group with a custom flow.
⚠ Removing forms from existing flows
Removing a form does not delete it from patients who already received or completed it
⚠ Adding forms to existing flows
Patients who have not completed the intake flow will be prompted to complete new forms
Patients who already completed the flow will not see new forms unless manually requested
⚠ Multiple intake flows
Patients are prompted to complete a new intake flow when their patient group changes
Only new forms trigger completion requests
Navigate to Forms → Intake Flows.
Creating a New Intake Flow
Click Create Intake Flow
Name the intake flow (visible to patients)
(Optional) Select a patient group
Click Create
Customize the intake flow:
Edit welcome message
Add forms:
Standard forms (Billing Info, Insurance, Photo ID, Profile Picture)
Custom forms
Or create a new form
Configure form settings:
Reorder forms
Mark required
Remove forms
Preview forms
Click Preview to view the full patient experience
Managing Patient Group Associations
A single intake flow can be associated with multiple patient groups.
Associate groups to an intake flow
Locate intake flow → Actions → Change Groups
Select groups → Associate Groups
Group change behavior:
Patients complete new forms if required by the new group
Patients do not see group or intake flow names
Creating an Empty Intake Flow
For patients who should not receive forms (e.g., discovery prospects):
Create a new intake flow (e.g., “Empty Intake Flow”)
Associate it with the appropriate patient group
Remove welcome message and do not add forms
Notification Settings (Intake Flow or Forms)
To enable or disable intake flow notifications:
Navigate to Settings → Notifications
Scroll to Patient Activities
Toggle notifications:
Intake flow started
Intake flow completed
Intake form or requested form completed