Patient Groups and Tags
Last updated: August 7, 2026
Osmind lets you organize patients using two complementary tools: Patient Groups and Patient Tags. Groups and Tags can be used to organize new referrals into intake work queues and track patients through the onboarding process. Upon patient creation, Osmind automatically sends a welcome email.
A patient can only belong to one group at a time, but can have an unlimited number of tags — so groups are best for mutually exclusive categories (like onboarding stage), while tags are better for layering on additional attributes.
Patient Groups
Creating patient groups is similar to creating a "list" in an email platform — it's a way to organize your patients and trigger specific workflows. Common uses include:
Distributing different intake forms to different groups of patients (e.g., a different intake for new referrals vs. established patients)
Automatically placing patients into group conversations, or sending message blasts to a group
Automatically sharing documents, folders, or education courses
Enabling visibility or access to certain patient packages
Reporting — reports show which group a patient is enrolled in
Creating a New Group
Many practices create groups based on the patient's stage (e.g., referral, new patient, active, follow-up), population type, or service line.
To add a new group:
Navigate to Patients
Click Add Group
Give your group a name (you can update it later)
Associating a Group with an Intake Flow
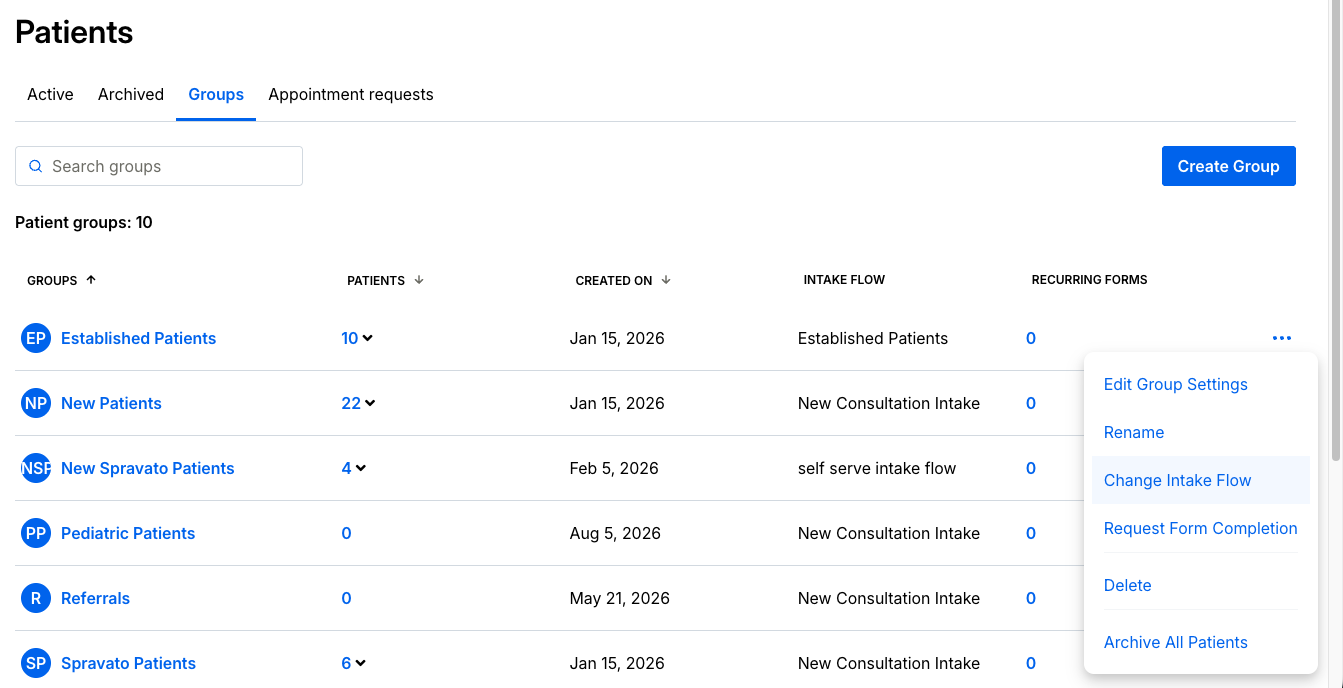
You may want different groups to receive different paperwork, or none at all. From the Patient Groups page:
Click Actions [...] next to the group
Select Change Intake Flow
Choose the intake flow to associate
Click Save Changes
Adding a Patient to a Group
Manually: When adding a new patient, you can sort them into a group directly:
Navigate to Patients > Add Patient
Select the group from the Patient Group dropdown
Click Add and Invite Patient
Automatically: Patients can also be automatically added to a group when they purchase a package or book a specific appointment type. This is optional — you can leave the group field blank, or select "Do not change patient's group" to keep manual control.
Keep in mind: if a patient books an appointment or purchases a package tied to a different group, they'll be moved out of their current group and into the new one, and prompted to complete any new paperwork tied to that group.
1) Associating an appointment type with a group:
Go to Settings > Calendar > Appointment Types
Click Actions [...] > Edit next to the appointment type
Select the patient in specific groups
2) Associating a patient package with a group:
Go to Billing > Patient Packages
Select Edit on the package
Scroll to the Group field and select the group
Optionally enable: moving new/groupless patients into this group, or moving all existing patients into this group
If a patient moves into a new group with new paperwork attached, they'll be prompted to complete it the next time they log in.
Changing or Deleting a Group
To delete a group permanently:
Click Actions [...] next to the group
Select Delete
Choose the group any existing members should move into
Click Delete
Deleted groups can't be recovered.
Best Practices
A patient can only be in one group at a time. If patients regularly overlap between two groups, consider creating a third group — or use Tags for the overlapping attribute instead.
Moving a patient into a new group does not trigger an email. If you want the patient notified to complete new forms, use a Request Form Completion — one email covers all forms tied to their new group.
Patients can only be removed from a group manually; unsubscribing from a package or program won't automatically remove them from the associated group.
Sharing a Document Automatically with a Group
Go to Documents > Actions [...]
Select Share
Choose the group — anyone currently in the group, or added later, will automatically receive the document
Patient Tags
Tags offer an additional way — beyond Groups — to assign attributes to patients and automate actions based on those attributes. Unlike groups, a patient can have an unlimited number of tags.
Getting Started with Tags
Navigate to Patients > Manage Tags to view existing tags or create a new one
From your Patients list, apply tags to individual patients (separate multiple tags with a comma)
Hover over a tag in the list to see all tags associated with that patient
Managing Tags from the Patient's Profile
Tags are visible directly on the patient's profile, just below their avatar, and in the banner at the top of their profile — so tag information stays visible anywhere you're viewing that patient's chart.
Use + Add Tag to add a tag
Hover over an existing tag and click [...] > Remove from Patient to remove it
Removing a Tag from the Patient List
From your Patient List, click the tag, then select Remove from Patient.
Filtering the Patient List by Tag
Click the All Tags filter
Select or deselect tags to curate your list
Click Apply to save your selection
Click the Tags filter again to clear your selections and start over.